
Submitted ByEdit Dates
Date Uploaded: February 10, 2004, 4:20 pm Last Edited: January 12, 2013, 7:23 pm |
 Add to Add toSite Favourites Print this Article |
Tumbler Construction
(Motor)
Article © MAIL User: Javelin
The Tumbler
Uses and construction of:
The tumbler is of great use to the hobby chainmailler. Tumbling cleans the finished piece; (I do not recommend using freshly cut rings in a tumbler. This will tangle your rings into a knot that takes time to unravel while weaving) and removes burrs from the ends of the ring at the closure. When tumbling is combined with chemicals (simple green or vinegar as examples) the cleaning power is increased (although suds can become an issue) or the stripping of galvy with vinegar is hastened.
The main problem is this: Most tumblers commercially available are of the lapidary type. Found mostly in the crafts section of department stores, these tumblers are of insufficient size to tumble more than bracelets or other small projects. If jewelry is what you do, then this may be your best approach. The average cost of these devices is about $30 US.
For those of us making slightly more cumbersome items, a larger tumbler is desired. It is to this end that this article has been written.
My first idea was to purchase a new cement mixer from Harbor Freight. Upon further contemplation, this will not work well considering how loud it’d be, the lack of space in my apartment, the drive to my parents' house where one could conceivably be set up, and the echo of the resounding smacks from my fiancée and mother should either of them awaken to the sound of thousands of rings continually smacking against the sheet-steel of the mixer drum. So that idea was scrapped.
My next idea involved a complicated rack setup with rollerblade wheels and an electric motor to spin a 5-Gallon bucket tilted at a 45-degree angle. This was also scrapped as too cumbersome, unnecessarily complex and un-portable.
The idea that will actually work has now been floating around in my brain for at least 4 months and I think I’ve worked all the bugs out of it.
First, build a rectangle out of appropriately sized wood. (all scale here will be for you to decide. Side notes are for what I’ve thought of for the size I need) Mine would be approximately 2’ by 2.5’, (long enough for a 5 gallon bucket to lay inside) and made of 2x6s.
Get yourself some steel rods sized to fit inside a rollerblade or skateboard wheel bearing, a 5 gallon bucket with a cover, an electric drill or electric motor (at least ¼ HP) and some tool-dip (the can of liquid rubber used to dip tool handles in for grip and cushion).
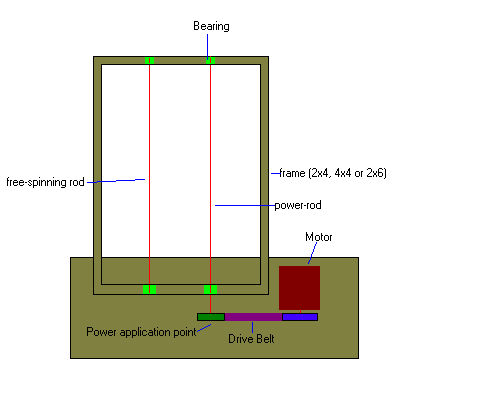
Mount your bearings in the wood on the narrow ends of your box so that the rods will run as in the diagram. Make sure they’re level, or your bucket will just flop over.
Make sure one end of one rod protrudes outside the box an inch or more, depending how you plan to attach your flywheel to it (epoxy, nuts and washers, welding).
At some point in the construction, coat the rods in tool-dip either leaving the ends clean or cleaning the ends after application. A piece of ½” PVC pipe with a cap on one end works rather well for this. However, after filling the pipe with tool-dip, you can’t really use it again, so it’s best to coat as many rods as you think you’ll need all in one sitting.
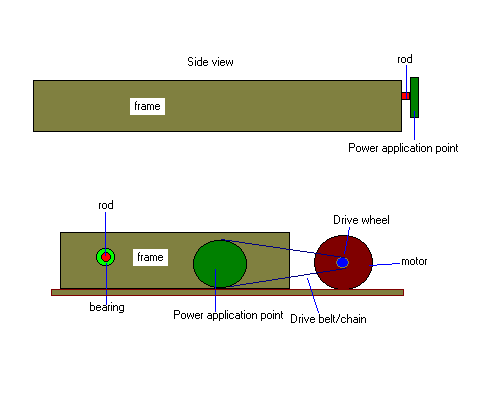
Once the rods are in place, attach your flywheel to the end of the protruding bar. This can be an actual flywheel, or the sprocket off of the old BMX bike in the garage. Attach a corresponding flywheel/sprocket to your motor. Mount the motor on a piece of plywood attached to the end of your box with the protruding rod. Play with the spacing so that the chain (which can be shortened with the master link) is as tight as you think it needs to be. Plug in your motor, throw the item to be tumbled into the bucket (along with any tumbling media you wish to use), lock down the lid, lay the bucket on the rods lengthwise and let her rip: freshly tumbled rings/hauberk for you. Here are the Diagrams I drew in paint that should clarify my ramblings. First the Top view and then the side and front.
Hope this helps you on your quest for rust removal, cleaning, de-burring, or whatever other application you might have. It may help to install fins inside the bucket prior to tumbling, much like a clothes-dryer drum. Otherwise, your piece will just lay there while the bucket spins around it. Tumbling media can be found at http://www.gemworld.com/TumbleMedia.asp
Comments are welcome. E-mail them to chainmaille6969@yahoo.com
Uses and construction of:
The tumbler is of great use to the hobby chainmailler. Tumbling cleans the finished piece; (I do not recommend using freshly cut rings in a tumbler. This will tangle your rings into a knot that takes time to unravel while weaving) and removes burrs from the ends of the ring at the closure. When tumbling is combined with chemicals (simple green or vinegar as examples) the cleaning power is increased (although suds can become an issue) or the stripping of galvy with vinegar is hastened.
The main problem is this: Most tumblers commercially available are of the lapidary type. Found mostly in the crafts section of department stores, these tumblers are of insufficient size to tumble more than bracelets or other small projects. If jewelry is what you do, then this may be your best approach. The average cost of these devices is about $30 US.
For those of us making slightly more cumbersome items, a larger tumbler is desired. It is to this end that this article has been written.
My first idea was to purchase a new cement mixer from Harbor Freight. Upon further contemplation, this will not work well considering how loud it’d be, the lack of space in my apartment, the drive to my parents' house where one could conceivably be set up, and the echo of the resounding smacks from my fiancée and mother should either of them awaken to the sound of thousands of rings continually smacking against the sheet-steel of the mixer drum. So that idea was scrapped.
My next idea involved a complicated rack setup with rollerblade wheels and an electric motor to spin a 5-Gallon bucket tilted at a 45-degree angle. This was also scrapped as too cumbersome, unnecessarily complex and un-portable.
The idea that will actually work has now been floating around in my brain for at least 4 months and I think I’ve worked all the bugs out of it.
First, build a rectangle out of appropriately sized wood. (all scale here will be for you to decide. Side notes are for what I’ve thought of for the size I need) Mine would be approximately 2’ by 2.5’, (long enough for a 5 gallon bucket to lay inside) and made of 2x6s.
Get yourself some steel rods sized to fit inside a rollerblade or skateboard wheel bearing, a 5 gallon bucket with a cover, an electric drill or electric motor (at least ¼ HP) and some tool-dip (the can of liquid rubber used to dip tool handles in for grip and cushion).
Mount your bearings in the wood on the narrow ends of your box so that the rods will run as in the diagram. Make sure they’re level, or your bucket will just flop over.
Make sure one end of one rod protrudes outside the box an inch or more, depending how you plan to attach your flywheel to it (epoxy, nuts and washers, welding).
At some point in the construction, coat the rods in tool-dip either leaving the ends clean or cleaning the ends after application. A piece of ½” PVC pipe with a cap on one end works rather well for this. However, after filling the pipe with tool-dip, you can’t really use it again, so it’s best to coat as many rods as you think you’ll need all in one sitting.
Once the rods are in place, attach your flywheel to the end of the protruding bar. This can be an actual flywheel, or the sprocket off of the old BMX bike in the garage. Attach a corresponding flywheel/sprocket to your motor. Mount the motor on a piece of plywood attached to the end of your box with the protruding rod. Play with the spacing so that the chain (which can be shortened with the master link) is as tight as you think it needs to be. Plug in your motor, throw the item to be tumbled into the bucket (along with any tumbling media you wish to use), lock down the lid, lay the bucket on the rods lengthwise and let her rip: freshly tumbled rings/hauberk for you. Here are the Diagrams I drew in paint that should clarify my ramblings. First the Top view and then the side and front.
Hope this helps you on your quest for rust removal, cleaning, de-burring, or whatever other application you might have. It may help to install fins inside the bucket prior to tumbling, much like a clothes-dryer drum. Otherwise, your piece will just lay there while the bucket spins around it. Tumbling media can be found at http://www.gemworld.com/TumbleMedia.asp
Comments are welcome. E-mail them to chainmaille6969@yahoo.com
Original URL: http://www.mailleartisans.org/articles/articledisplay.php?key=155
