
Submitted ByEdit Dates
Date Uploaded: April 9, 2008, 2:10 pm Last Edited: August 7, 2012, 9:52 pm |
 Add to Add toSite Favourites Print this Article |
Very Simple Tumbler
Article © MAIL User: oneringshortofafullcoil
This is a tumbler design inspired by loserkids simple tumbler design
Using a bucket with a lid and a mandrel rod, this is not for wet tumbling
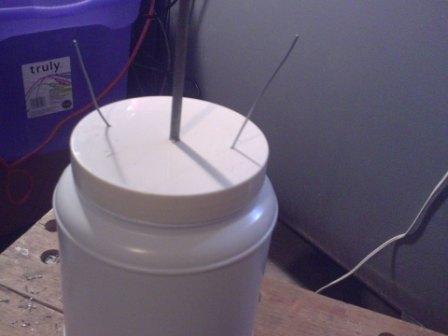
1 Get a bucket with a lid, one appropriate for your purpose, mine is a 2 litre container (perfect for chains and fobs). Remember the bigger the bucket the heavier it is, plus more media to fill it.

2 Drill a hole in the centre of the bottom of the bucket, and the lid (big enough for a mandrel rod).
The bigger the drum the more critical it is these holes be perfectly aligned for mine I eyeballed it.

3 Next Punch two smaller holes opposite each other in each the top and the bottom. Try and get them close to the edge (all things relative to the size of your drum).

4 Push the mandrel rod through the bottom of the bucket so that the “eye” you normally pass your wire through comes out the bottom and pass a piece of wire(I used 16 gauge) 2.5-3times the length of your bucket through the “eye” in your mandrel rod

5 Feed the two ends of 16gauge through the extra holes in your bucket and out through the extra holes in the top (when you close it, fold any excess over).

Turn by hand or with a drill
IF you use the drill set it for the lowest possible speed
and only run it for half an hour to an hour at a time as this can be very hard on your drill an it can get very hot.
Now all you need is some media and you're good to go.
I use 60% rice (white long grain , cheapest), 30% sand, and 10% scrap wire bits.
Here is a picture of mine in action.

Thanks to Loserkid for the inspiration and to the Ed. For leaving it up despite the lack of photos
This ones for you.
Using a bucket with a lid and a mandrel rod, this is not for wet tumbling
1 Get a bucket with a lid, one appropriate for your purpose, mine is a 2 litre container (perfect for chains and fobs). Remember the bigger the bucket the heavier it is, plus more media to fill it.
2 Drill a hole in the centre of the bottom of the bucket, and the lid (big enough for a mandrel rod).
The bigger the drum the more critical it is these holes be perfectly aligned for mine I eyeballed it.
3 Next Punch two smaller holes opposite each other in each the top and the bottom. Try and get them close to the edge (all things relative to the size of your drum).
4 Push the mandrel rod through the bottom of the bucket so that the “eye” you normally pass your wire through comes out the bottom and pass a piece of wire(I used 16 gauge) 2.5-3times the length of your bucket through the “eye” in your mandrel rod
5 Feed the two ends of 16gauge through the extra holes in your bucket and out through the extra holes in the top (when you close it, fold any excess over).
Turn by hand or with a drill
IF you use the drill set it for the lowest possible speed
and only run it for half an hour to an hour at a time as this can be very hard on your drill an it can get very hot.
Now all you need is some media and you're good to go.
I use 60% rice (white long grain , cheapest), 30% sand, and 10% scrap wire bits.
Here is a picture of mine in action.
Thanks to Loserkid for the inspiration and to the Ed. For leaving it up despite the lack of photos
This ones for you.
Original URL: http://www.mailleartisans.org/articles/articledisplay.php?key=463
