
Submitted ByEdit Dates
Date Uploaded: April 9, 2016, 2:27 pm Last Edited: April 9, 2016, 2:29 pm |
 Add to Add toSite Favourites Print this Article |
Universal Triangle Tutorial
(CGI)
Article © MAIL User: thearmourman
The Universal Triangle weave is made up of little mobius type units that are woven into a sheet. The ideal AR, at least at the time I am writing this, is an AR of 4.2. Follow the tutorial below and you should have a good understanding in no time. It's a bit of a long read, but that's because I went into so much detail. Good luck!
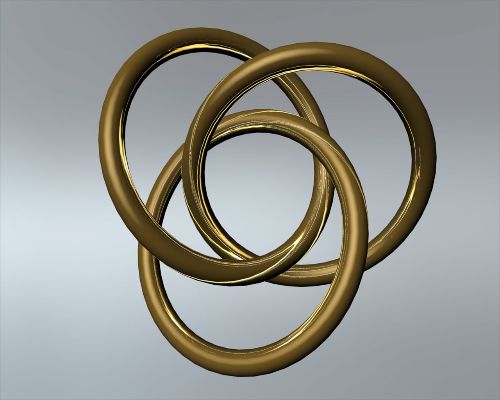
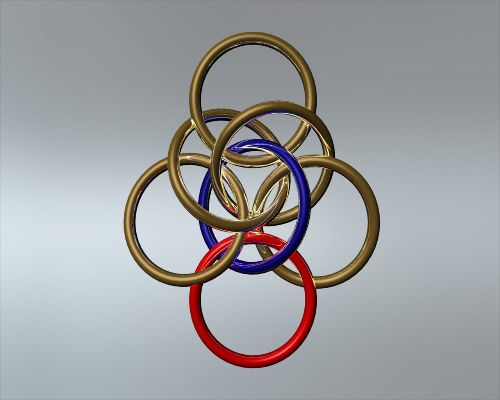
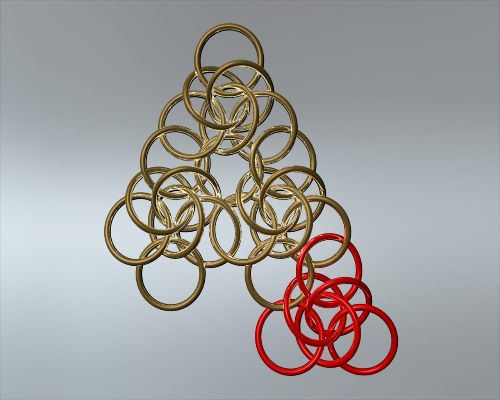
Step 1. Begin by making a three ring Mobius Ball. Each ring goes through each other ring.
Step 2. Put a ring (red) through one of the mobius ball rings (blue), and between the other two.
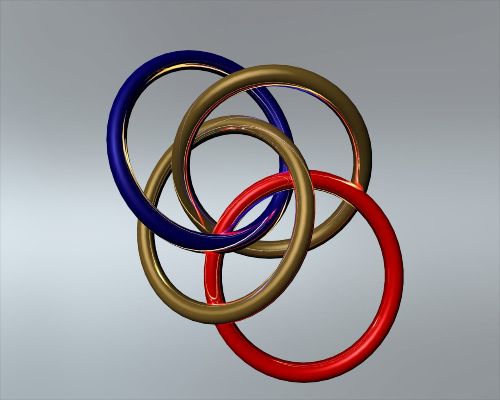
Step 3. Repeat the process by putting a ring (red) through a different mobius ball ring (blue), and between the other two.
Step 4. Do it again by putting a ring (red) through the third mobius ball ring (blue), and between the other two. I'm going to call this piece the first unit.
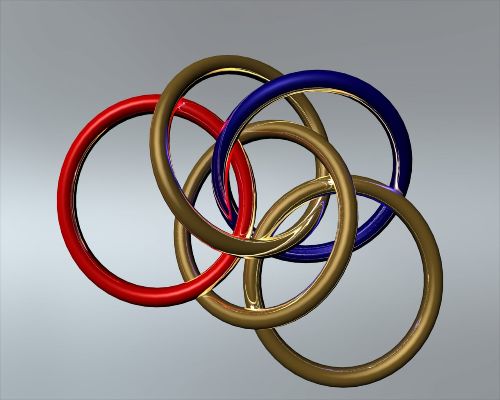
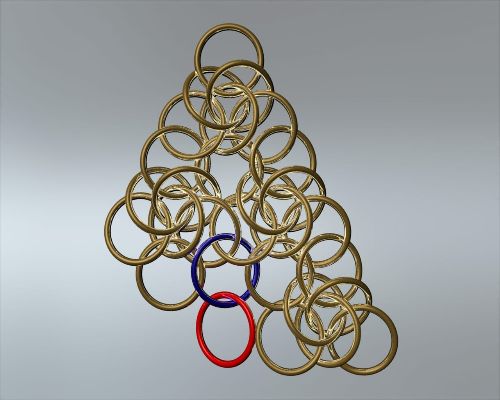
Step 5. Add a ring (red) by putting it through one of the mobius ball rings (blue).
Step 6. Make a new three ring mobius ball (red), but before you close the third ring put it through the ring added in the previous step (blue)
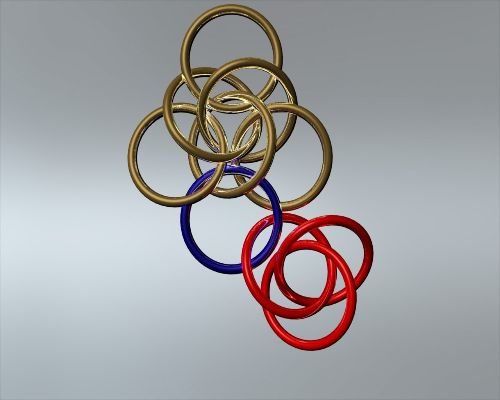
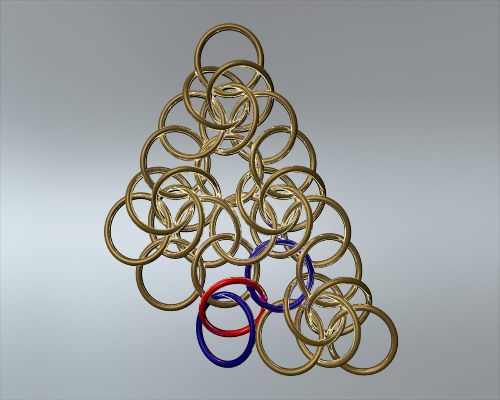
Step 7. Put a ring (red) through the bottom right ring of the first unit you made (blue). Also put it through a mobius ring from the second unit (blue), making sure it is sandwiched between the other two mobius rings.
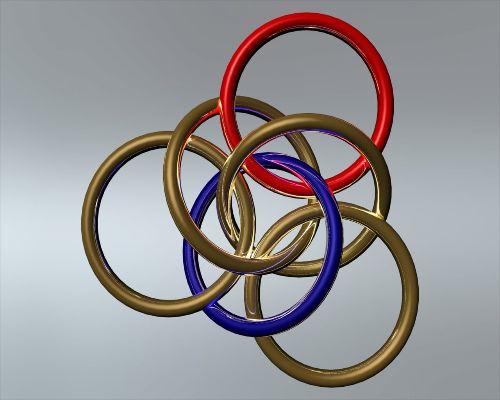
Step 8. Put a ring (red) on the bottom right of the weave, through the mobius ring opposite (blue), and sandwiched between two other mobius ball rings.
Step 9. Add a final ring (red) by putting it through the last mobius ball ring (blue), and sandwiched between the other two mobius rings.
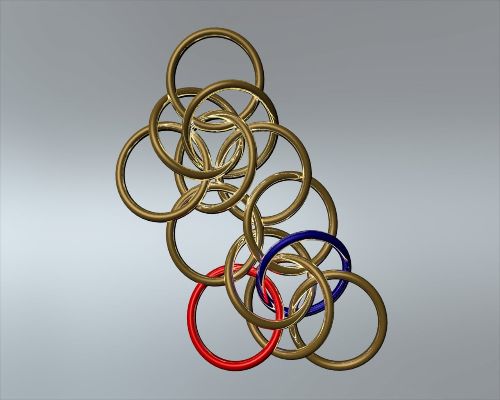
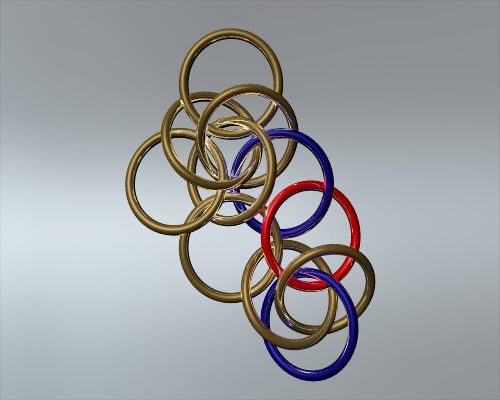
Step 10. Move over to other side of the piece, and add a ring (red) through the bottom left ring (blue) of the original unit.
Step 11. Attach a ring (red) to the ring you added in the previous step (blue).
Step 12. Put a ring (red) through the the ring you added in the previous step (blue), along with the ring that is directly below the first unit (blue).
Step 13. Put a ring (red) through the previous two rings (blue) completing the mobius ball.
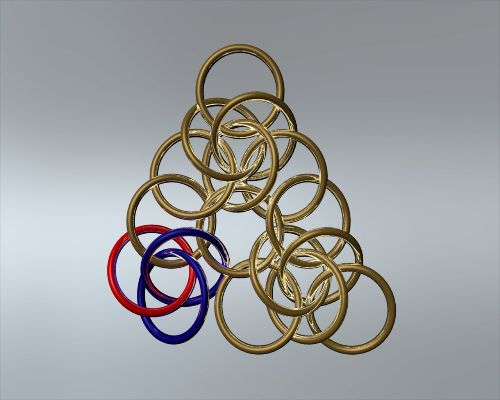
Step 14. Put a ring (red) through the mobius ring just added (blue), and also through the bottom left ring from the second unit (blue).
Step 15. Finish the third unit by adding a ring (red) through the final mobius ring (blue).
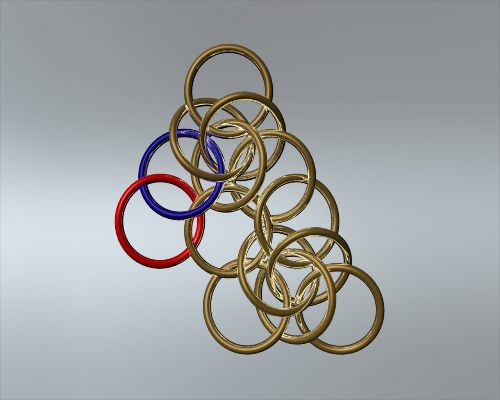
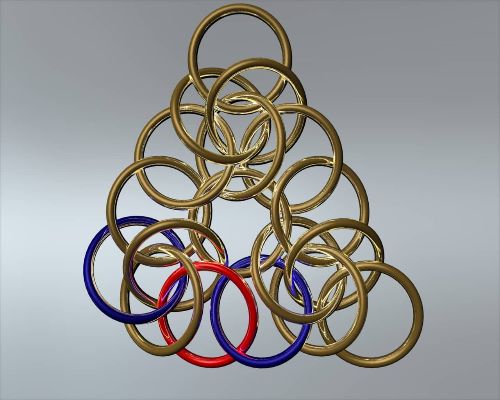
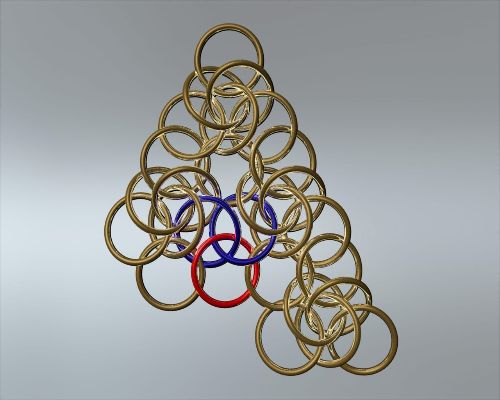
Step 16. Add two rings (red), one below each of the units on the second row and connected to the bottom mobius rings (blue).
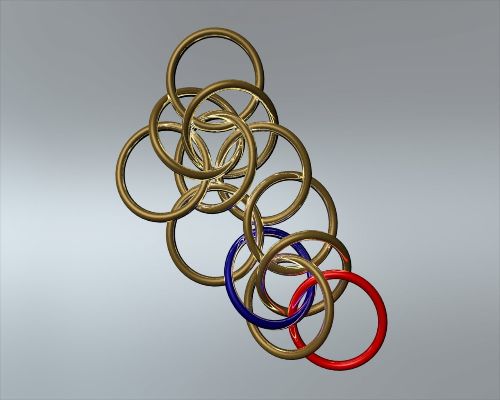
At this point you might be confident enough to keep adding rows yourself. However, the third row is a little different, so if you don't feel confident enough keep reading!
Step 17. Repeat steps 6-9 to attach a unit to the right side of the third row.
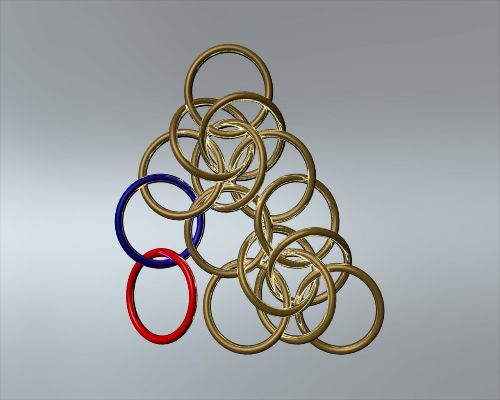
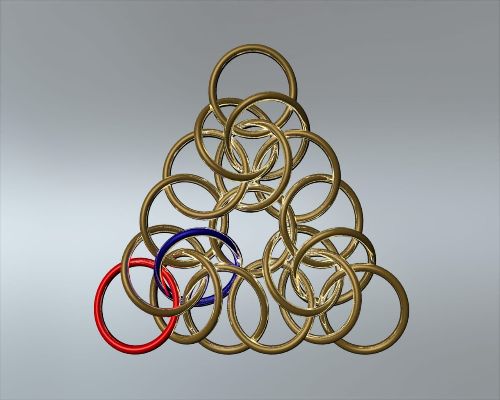
Step 18. Connect a ring (red) to the two middle rings of the second row (blue).
Step 19. Put a ring (red) through the ring (blue) added in the previous step.
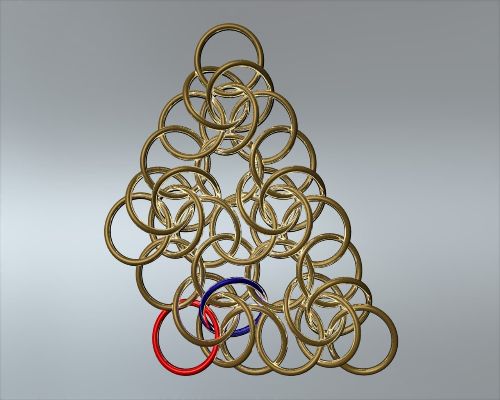
Step 20. Put a ring (red) through the ring just added (blue), and the ring connected directly below the right unit on the second row (blue).
Step 21. Connect a ring (red) that goes through the previous two added rings (blue), and also the ring connected directly below the left unit on the second row (blue).
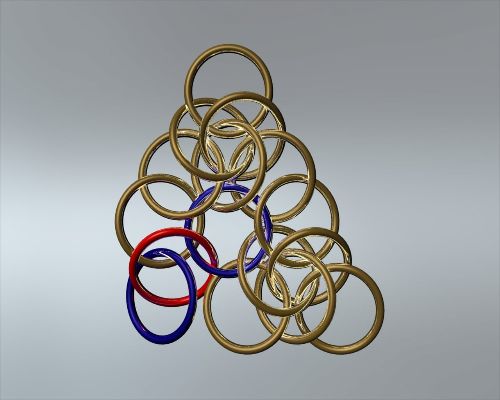
Step 22. Put a ring (red) through the ring just added in the previous step (blue) and the bottom left ring of the unit to the right on the same row (blue).
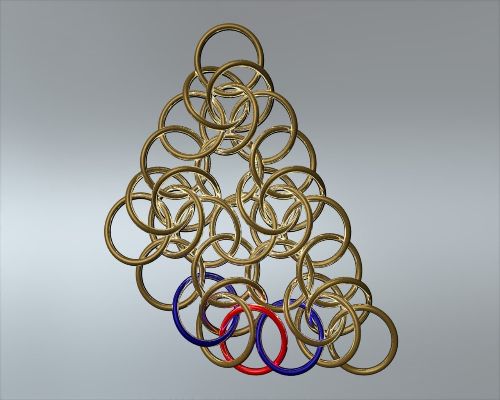
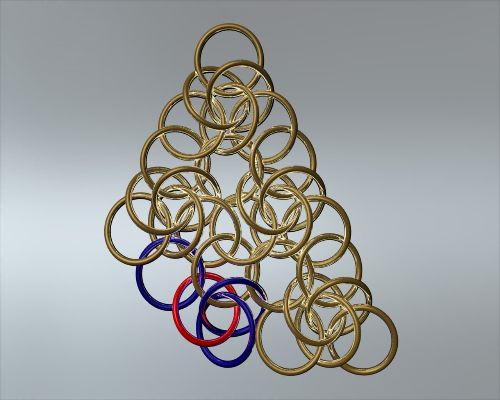
Step 23. Finish the unit by connecting a ring (red) on the bottom left that goes through the opposite mobius ring (blue).
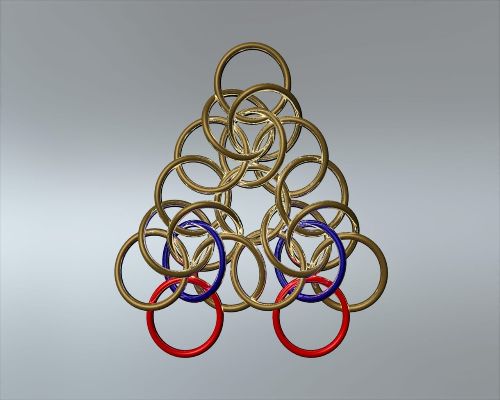
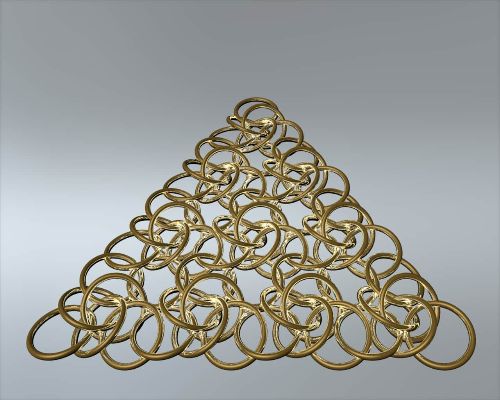
Step 24. And that's it. Repeat steps 10-15 to finish that row, and repeat by adding more rows. When you are finished, it might look something like this:
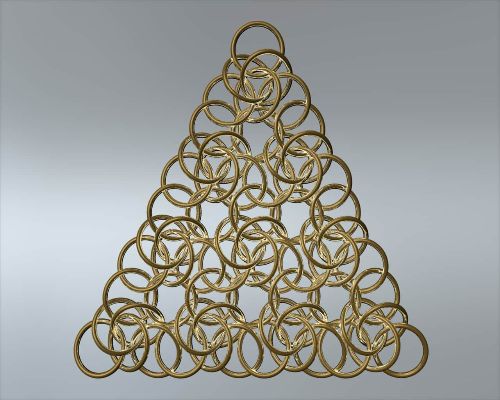
Enjoy!
Universal Triangle Weave Tutorial Steps
Step 1. Begin by making a three ring Mobius Ball. Each ring goes through each other ring.
Step 2. Put a ring (red) through one of the mobius ball rings (blue), and between the other two.
Step 3. Repeat the process by putting a ring (red) through a different mobius ball ring (blue), and between the other two.
Step 4. Do it again by putting a ring (red) through the third mobius ball ring (blue), and between the other two. I'm going to call this piece the first unit.
Step 5. Add a ring (red) by putting it through one of the mobius ball rings (blue).
Step 6. Make a new three ring mobius ball (red), but before you close the third ring put it through the ring added in the previous step (blue)
Step 7. Put a ring (red) through the bottom right ring of the first unit you made (blue). Also put it through a mobius ring from the second unit (blue), making sure it is sandwiched between the other two mobius rings.
Step 8. Put a ring (red) on the bottom right of the weave, through the mobius ring opposite (blue), and sandwiched between two other mobius ball rings.
Step 9. Add a final ring (red) by putting it through the last mobius ball ring (blue), and sandwiched between the other two mobius rings.
Step 10. Move over to other side of the piece, and add a ring (red) through the bottom left ring (blue) of the original unit.
Step 11. Attach a ring (red) to the ring you added in the previous step (blue).
Step 12. Put a ring (red) through the the ring you added in the previous step (blue), along with the ring that is directly below the first unit (blue).
Step 13. Put a ring (red) through the previous two rings (blue) completing the mobius ball.
Step 14. Put a ring (red) through the mobius ring just added (blue), and also through the bottom left ring from the second unit (blue).
Step 15. Finish the third unit by adding a ring (red) through the final mobius ring (blue).
Step 16. Add two rings (red), one below each of the units on the second row and connected to the bottom mobius rings (blue).
At this point you might be confident enough to keep adding rows yourself. However, the third row is a little different, so if you don't feel confident enough keep reading!
Step 17. Repeat steps 6-9 to attach a unit to the right side of the third row.
Step 18. Connect a ring (red) to the two middle rings of the second row (blue).
Step 19. Put a ring (red) through the ring (blue) added in the previous step.
Step 20. Put a ring (red) through the ring just added (blue), and the ring connected directly below the right unit on the second row (blue).
Step 21. Connect a ring (red) that goes through the previous two added rings (blue), and also the ring connected directly below the left unit on the second row (blue).
Step 22. Put a ring (red) through the ring just added in the previous step (blue) and the bottom left ring of the unit to the right on the same row (blue).
Step 23. Finish the unit by connecting a ring (red) on the bottom left that goes through the opposite mobius ring (blue).
Step 24. And that's it. Repeat steps 10-15 to finish that row, and repeat by adding more rows. When you are finished, it might look something like this:
Enjoy!
Original URL: http://www.mailleartisans.org/articles/articledisplay.php?key=765
