
Submitted ByEdit Dates
Date Uploaded: October 21, 2007, 2:08 am Last Edited: January 13, 2013, 4:13 am |
 Add to Add toSite Favourites Print this Article |
A Wire-Wrapping Technique for Disc Shapes
Article © MAIL User: Zuriel
Big, flat, shiny objects can make excellent pendants. But sometimes they don't have holes for wire, and you can't make one.
This is a cool wrap that can tightly secure a disc or disc-like object for use as a pendant. I will be using a coin to demonstrate. for something else, replace "coin" with whatever you're wrapping, and it's all good ;)
(for the tutorial pics I used 20 gauge colored copper wire)
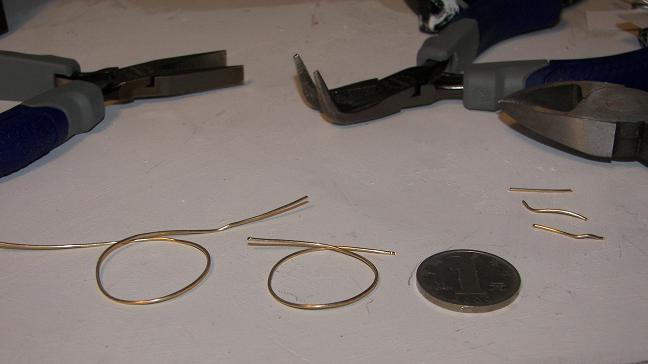
To begin, you'll need to measure two hoops of wire. One should go all the way around the "coin" one and a half times with a bit of space between the wire and the "coin," enough space that you could fit your wire inside it. The other should go around nearly twice, with the same amount of space. The wire that overlaps should be out straight in two "bunny-ears" (just look at the pic.) You will also need three little pieces of wire about 3/4 to 1 inch long.

Put the two hoops together.
Wrap one of the small pieces of wire around both of the two hoops opposite of where the "bunny-ears" meet. It should be tight enough to make the rings fairly rigid. The two hoops should be laying one on top of the other, looking at it laid down on the table. You should keep checking to make sure that the "coin" still fits into the circle.

Wrap the other little pieces of wire around the two hoops at 3 o'clock and 9 o'clock, then trim off the excess wire from the little pieces.

Bend the "bunny-ears" up, away from the center of the circle.
Take one of the long "bunny-ears" and coil it around the other three to join them all together.

Pull each section, separated by the wraps and the coil, and pull them away from each other.


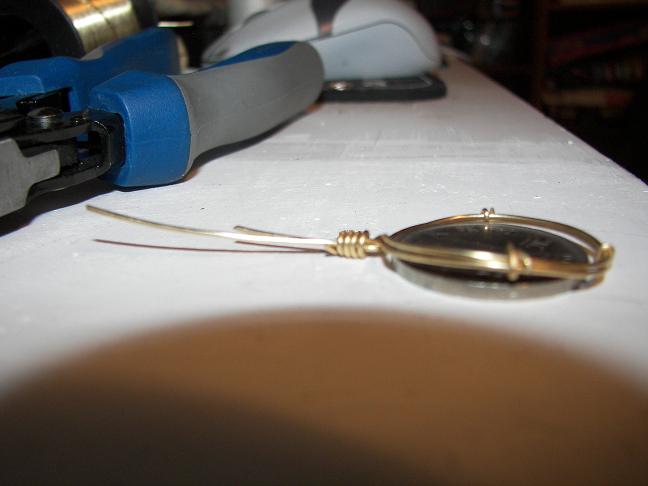
Place the "coin" into the center of the circle, and pull the sections towards the center. Sometimes it helps to pull one side to the center. Then place the coin inside, flip it over, and pull that side shut. Clamp the wires on opposite sides of the "coin" together so that it's tightly fitted.

To finish up, you simply make one of the small bunny ears into a loop (to hold the pendant to the chain) and do whatever you want with the other two. Personally, I like to fold the remaining little ear over the coil to hold it steady, and then make a circle from the other ear to hide the coil, but that's just me.

This wrap works well with coins, those little cheap decorative glass beads, and anything else relatively flat.
This is a cool wrap that can tightly secure a disc or disc-like object for use as a pendant. I will be using a coin to demonstrate. for something else, replace "coin" with whatever you're wrapping, and it's all good ;)
(for the tutorial pics I used 20 gauge colored copper wire)
To begin, you'll need to measure two hoops of wire. One should go all the way around the "coin" one and a half times with a bit of space between the wire and the "coin," enough space that you could fit your wire inside it. The other should go around nearly twice, with the same amount of space. The wire that overlaps should be out straight in two "bunny-ears" (just look at the pic.) You will also need three little pieces of wire about 3/4 to 1 inch long.
Put the two hoops together.
Wrap one of the small pieces of wire around both of the two hoops opposite of where the "bunny-ears" meet. It should be tight enough to make the rings fairly rigid. The two hoops should be laying one on top of the other, looking at it laid down on the table. You should keep checking to make sure that the "coin" still fits into the circle.
Wrap the other little pieces of wire around the two hoops at 3 o'clock and 9 o'clock, then trim off the excess wire from the little pieces.
Bend the "bunny-ears" up, away from the center of the circle.
Take one of the long "bunny-ears" and coil it around the other three to join them all together.
Pull each section, separated by the wraps and the coil, and pull them away from each other.
Place the "coin" into the center of the circle, and pull the sections towards the center. Sometimes it helps to pull one side to the center. Then place the coin inside, flip it over, and pull that side shut. Clamp the wires on opposite sides of the "coin" together so that it's tightly fitted.
To finish up, you simply make one of the small bunny ears into a loop (to hold the pendant to the chain) and do whatever you want with the other two. Personally, I like to fold the remaining little ear over the coil to hold it steady, and then make a circle from the other ear to hide the coil, but that's just me.
This wrap works well with coins, those little cheap decorative glass beads, and anything else relatively flat.
Original URL: http://www.mailleartisans.org/articles/articledisplay.php?key=445
