
Submitted ByEdit Dates
Date Uploaded: June 18, 2009, 2:04 am Last Edited: December 19, 2012, 12:15 pm |
 Add to Add toSite Favourites Print this Article |
Helm Orb
(CGI)
Article © MAIL User: MaxumX
This is an odd one indeed. You will need 4 ring sizes for Helm Orb. Unfortunately I don't have that information available but I can show you how to make it none the less, though I know not the ring sizes used to do it.
EDITED TO ADD:
.236"ID x .039wire AR of 6.0
.196"ID x .031wire AR of 6.3
.118"ID x .031wire AR of 3.8
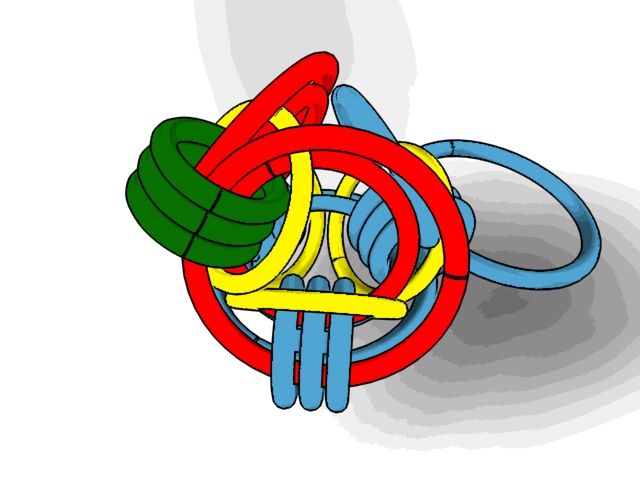
Key:
Green = active ring
Red = interpolated rings
Blue = inactive or finished weave
Yellow = Orbital / Captive ring
Ring sizes:
OK on this I don't know but I can give you a place to start here. The smallest rings have to fit 5in1. The largest needs to cover the medium sized rings completely inside of it. The two mid sized rings have the same inner diameter but are made from different wire diameters. Also they must fit 6in1 and pass through the larger ones enough to be connected through the large rings. That is about all I can do for you here. I'll get the rings sizes posted (or at least the AR's) when I have played with it a bit in reality.
OK now that we are completely lost let's get to work.
Step one: Begin with your 4 odd rings size. Note: you may be able to get away with 3 ring sizes if medium ones are of the right AR.

Step Two: Weave nine rings onto one medium and one large one. This will become our reference point as the base.

Step Three: Take three medium rings with the larger wire and weave them around the smaller ones in groups of three.

Step Four: Next weave in three larger rings through the smaller ones. One on each side.

Step Five: Once again adding to the base, weave in three medium rings with the smaller wire diameter through the small rings.

Step Six: Now starts the fun part, we'll add an orbital ring on the intersection of the medium rings in the center by holding it there. Now fold up the two larger ones on the sides holding the captive ring in place. Next through all of that mess weave in three Small rings through the now center medium rings and the large rings.
Step Seven: Repeat step 6 for the other two sides.

Step Eight: Ahh there is no step eight unless you count turning it over..lol

You're done! But for giggles here's another shot of it:

EDITED TO ADD:
.236"ID x .039wire AR of 6.0
.196"ID x .031wire AR of 6.3
.118"ID x .031wire AR of 3.8
Key:
Green = active ring
Red = interpolated rings
Blue = inactive or finished weave
Yellow = Orbital / Captive ring
Ring sizes:
OK on this I don't know but I can give you a place to start here. The smallest rings have to fit 5in1. The largest needs to cover the medium sized rings completely inside of it. The two mid sized rings have the same inner diameter but are made from different wire diameters. Also they must fit 6in1 and pass through the larger ones enough to be connected through the large rings. That is about all I can do for you here. I'll get the rings sizes posted (or at least the AR's) when I have played with it a bit in reality.
OK now that we are completely lost let's get to work.
Step one: Begin with your 4 odd rings size. Note: you may be able to get away with 3 ring sizes if medium ones are of the right AR.
Step Two: Weave nine rings onto one medium and one large one. This will become our reference point as the base.
Step Three: Take three medium rings with the larger wire and weave them around the smaller ones in groups of three.
Step Four: Next weave in three larger rings through the smaller ones. One on each side.
Step Five: Once again adding to the base, weave in three medium rings with the smaller wire diameter through the small rings.
Step Six: Now starts the fun part, we'll add an orbital ring on the intersection of the medium rings in the center by holding it there. Now fold up the two larger ones on the sides holding the captive ring in place. Next through all of that mess weave in three Small rings through the now center medium rings and the large rings.
Step Seven: Repeat step 6 for the other two sides.
Step Eight: Ahh there is no step eight unless you count turning it over..lol
You're done! But for giggles here's another shot of it:
Original URL: http://www.mailleartisans.org/articles/articledisplay.php?key=481
