
Submitted ByEdit Dates
Date Uploaded: December 21, 2009, 1:51 am Last Edited: December 9, 2012, 2:31 am |
 Add to Add toSite Favourites Print this Article |
Cutter Discussion
Article © MAIL User: sakredchao
There are a lot of different ways to cut rings, and maillers always seem to be looking for that 'perfect cut'. I'm going to go over various methods of cutting rings, my experiences with various tools, and tips for doing things. With all tools, get to know your tool, pay attention to how it works, and keep it well-maintained and lubricated.
Snips
There are both positive and negative aspects to snip cutting. One of the positive aspects is that they give relatively nice // cuts. Of course, the quality of the cut depends on the sharpness of the blades.
There are many different kinds of snips on the market, and by far the most popular brand is Wiss. One of the drawbacks to Wiss snips is that both faces of the cutting jaw are serrated, or toothed. While this is nice for gripping the wire, it makes it difficult to sharpen them. I prefer Prosnip as it has 1 toothed jaw and 1 smooth jaw.
Left, right and straight cutting snips are available. These tools are designed for cutting sheet metal, so there are several varieties to fit the needs of the sheet workers. For most maille purposes the 'straight cutting' snips are desired. For Wiss, these are the M3(yellow handle) and M5 (red handle) tools. From Prosnip, it is #103(yellow handle).
There are also other less expensive, generic snips on the market.
How to Use Snips
I wind my springs tightly. Some people wind loose springs so that the rings are already opened, but i find that the rings don't come out a consistent size. These comments are based on tight springs so your experiences may be different.
Only cut one or two rings at a time. The more rings you cut at a time, the greater your ring distortion will be. (More on ring distortion below).
Do not allow the cutter jaws to close all the way. This causes fish hook ring distortion (discussed below). I put the jaws as far into the spring as I can and cut only one or two rings.
Snips, in my experience are one of the more difficult to use tools for maille. Since they are basically industrial scissors, they act like scissors do with paper sometimes: the spring will want to go between the blades. This causes an unsightly and unpleasantly tactile closure. There are ways of solving this, but first you must identify what is happening. When you try to cut the spring, the ring you are trying to cut will attempt to rotate at the point you are cutting it. This point of rotation is what tries to slip between the blades. This causes a 'valley' in the next several rings, making them much more difficult to cut, as they are already trying to slip between the cutter blades. There are several things you can do to avoid, and fix this when it happens:
1. Hold the end of the spring tightly between your thumb and the side of your index finger. If you hold the ring
you are cutting and the next couple rings behind it, the ring will have no place to rotate, and the snips will have nowhere to go but through the wire. After a day of this you can easily develop a blister on your thumb whether you have a callous or not. Gloves may help, but I find it difficult to cut springs with gloves on.
2. Twist your snips against the rotating ring while you cut. If the wire wants to go between the blades, then twisting the snips against the direction they want to go will facilitate your cutting as you twist at the wrist.
3. Move the snips in a slight downward motion as you twist. It is much easier to cut something by dragging a knife along it than by pressing down on it with a knife. Moving downward slightly slides the blade along the metal, facilitating your cut.
Experiment with different variations of this, and find the perfect method for you, or throw it out the window and do it your own way (my favorite choice).
Ring Distortion
The three groups of rings in this image are:
raw (top center)
closed (lower left)
closed and made flush (lower right)
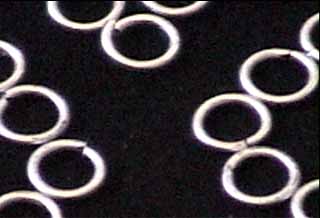
When you cut a ring with snips, one end of the ring is pushed up as you can see in the lower left group of rings. This can be fixed in two ways. The one I prefer to use is to squish the ring by putting pressure on the outside, and pushing the raised end to meet with the other end. The other way is placing the closure between the jaws of your pliers and moving both ends of the ring. I find this method mars the ring really easily. Either method can be done rather quickly once you get used to it, but it adds a lot of time after 10,000 repetitions.
Another kind of ring distortion that you can get is when you allow the jaws of the snips to close all the way. Your ring comes out looking like a fish hook. These can be 'squished' back into a round ring. Some people like to use these as opened rings, but I find that they take more time than simply cutting one at a time. If you find that you are always getting fish hook distortion, it may be caused by a couple of factors:
1. You may be applying too much pressure too quickly. Learn to feel the snips cut through the wire, and listen for the 'click' when the blades hit the next ring. Let up on the snips when you hear the click.
2. The inner diameter of the spring may be too small for the end of the jaws of the snips. Try holding the snips upside down, as sometimes the upper cutting head is thinner than the lower and will allow you to get it further into the spring. Another option is grinding down the head of your snips a little bit. You can read more about this in the article Modified Aviation Snips, which was written by David Austin.
***** Important *****
Some people have luck with cutting stainless steel rings with snips. I do not advise it. I have had snips that will not work for three ring sizes because of a silly experiment. Never use your good tools on hard metals without testing them with a pair of junkers first!
Bolt Cutters
Generic bolt cutters are really easy to use. You can cut as many rings at a time as you want and you're still going to get the same lousy >< cut. There are some modifications you can do to them to improve them, but I won't go into that here.
Knipex Cobolt 2 Bolt Cutters
These are the best tool I have ever used for cutting hard stainless. They are usually rather expensive, but worth every penny. If you get these, get the spring-loaded ones! It's worth the extra five dollars.
For some magical reason the cuts that these give on hard metals is somewhere between >< and //, and that's saying something for hand-cut stainless!
Diagonal Cutters
Generic diagonal cutters are much like generic bolt cutters, but they give a slightly better cut. I have had 1/4" of a jaw break off of a pair of these while cutting 17ga galvanized wire. This is a popular tool for the 'score and break' method of cutting rings.
Klein 2000-D48
A Klein tool, like any quality tool, is a wonderful thing. I have had mine for over a year and a half and have seen very little dulling. In fact, I can still cut thread cleanly with these... they're that sharp. Klein makes two pairs of diagonal cutters that are very similar: the angled head (2000-D48), and the straight head (2000-D28). If you have a choice, get the angled head, it is a wonderful thing.
Electrician's Wire Cutters
These are much like diagonal cutters, except much, much smaller. these are usually used for micromaille applications.
Xuron Double-flush Cutters
I have never used these, but from what i understand they are the best tool for micromaille on the market.
Toenail Clippers
You may laugh, but these can be really handy for some of those insanity maille projects that you've never been wanting to do. Not good for harder metals.
End Nippers
These function much like diagonal cutters except the cutting surface is perpendicular to the handles. this is a common tool for the 'score and break' method of cutting rings.
Jeweler's Saws
These things are wonderful! I can get blades in sizes ranging from 8/0 to 10 (from my supplier). The variety of blades are useful, for me, from 28ga wire to 6ga wire. Jewelers saw blades only cut in one direction, as opposed to hack saws (see below). It helps to lubricate your saw blade. You can use beeswax, professional saw blade wax stuff, professional grade lubricant oil, or nose grease. I find nose grease to be the most cost effective. I rub my nose with my thumb and forefinger, and slide it along the blade every 10 minutes or so.
When purchasing a jeweler's saw make sure to get an adjustable frame. Your blade should sit taught, and if the frame does not adjust then your blade will be loose and more likely to break.
Hack Saws
There are two major varieties of hack saws that I have seen.
Full fledged hack saws: while these are nice for breaking out of jail, but they are unwieldy for making chainmaille.
Hobby hack saws: the blades on these are about 5"-6" long, and the one I have has a 4ga wire frame.
Hack saw blades not only cut straight down, but they also remove material on the side as they cut, making the kerf wider.
Hack saw blades are easier to use when lubricated, much like jeweler's saws. You can use any of the lubricants listed above for jeweler's saws on hack saw blades.
Dremel Tool
Seeing as I've never used one I asked Dweezle.
Thanks Dweezle!
--Lubrication.
I never used any, but I think it might help keep things from heating up too much. I'm not sure what it's called, but there's some sort of cutting oil we use in the shop for drilling through thick metal. Something like that might help for dremel cutting. But then again, metal dust, and dust from the disc might just combine with the lube and muck things up.
--Cutting Discs.
I'm not sure what they are called, but I used some 1/32' [1/32"? -- ed] thick red-brown colored abrasive cut-off discs, probably about 1" in diameter. They were expensive and it was probably about six years ago so I don't remember what they cost, but the ratio of price to life expectancy was not good. They also liked to shatter and send chunks of themselves into my face. Another disc I used was an abrasive cut-off disc that was reinforced with fiberglass. They were probably about twice as thick as the others but I remember they were lot more durable. I did not use them much because of the thickness. Diamond-coated discs are also available, but they're made for cutting glass and stone. I've heard they heat up too much for cutting metal.
--Safety.
Wear safety goggles to protect from flying disc fragments and the occasional flying ring. A dust mask is also a good idea so you don't breathe in the metal and abrasive dust. Gloves are also good. Don't hold the coil in your hands while cutting. If holding the dremel in your hands while cutting, it's best to hold it with both hands and be careful of kickback that will happen once in a while (sometimes accompanied by shattering discs).
--What's Involved?
A dremel and some cut-off discs. Something to hold the coil while cutting is good. Maybe a wooden or metal rod held horizontally in a vice and a bucket to catch rings that might slide off the end. Just start at one end of the coil and work your way to the other end.
I know a guy who had another method where he put the dremel in the vice and hand fed the coil into it, with a container to catch rings.
If I was going to use a dremel again for cutting coils I'd rig up some kind of bench-top thing with the coil held horizontally on a mandrel, and the dremel bolted down on a thing that could slide over the length of the coil. It would prevent the kickback you get from holding the dremel by hand. Another thing that comes to mind is building something similar to that coil cutter jump ring making tool that people on The Chainmaille Board have mentioned a few times. But I'd probably need access to a machine shop for that.
--Maintenance
Not sure. Let the dremel take a break once in a while. The motor in my first cheap wannabe dremel burned out because I over-worked it. If a dowel or mandrel is used to hold the coil while cutting, it'll probably need to be replaced once in a while. Constant need to buy more discs is the biggest problem.
I'll mention that a dremel can be used to score a line down the length of the coil, then the rings can be twisted off. It is the same idea as the 'score and break' method of cutting rings. I use that for brass and bronze alloys that don't like me trying to score them with cutters.
Band Saw
Thank you Simon-Pierre Aubin for providing us with this information.
--Safety considerations
The work space must be clean and appropriate. Wear gloves and security glasses. The band saw is kind of noisy so ear protection would be better (earmuffs or earplugs).
--Lubrication? yes/no?
You may lubricate the blade with a special cutting wax but candle wax is fine too.
The lubrication of the blade is not necessary but it extends the blade's life.
--What sort of setup is involved?
To cut rings with a portable band saw, you need a vise to keep the coil steady. I've replaced the metal jaws of my vise for nylon jaws, it keeps the coils better that way. Unfortunately, the nylon jaws melt with the heat generated by the cut so I have to replace the jaws from time to time (not too often). I can only cut coils from two to three inches long. I lose a bit more material, but the speed increase compensates this very much. With this method, I can cut 20,000 rings (16g, 1/4" ID but the ring size doesn't matter) in one day (I've made it).
--Is there a lot of maintenance involved with this machinery?
There's no more maintenance needed than for a electric drill or a scroll saw. You need to replace the blade from time to time (depends on the blade and the type of metal you cut).
Snips
There are both positive and negative aspects to snip cutting. One of the positive aspects is that they give relatively nice // cuts. Of course, the quality of the cut depends on the sharpness of the blades.
There are many different kinds of snips on the market, and by far the most popular brand is Wiss. One of the drawbacks to Wiss snips is that both faces of the cutting jaw are serrated, or toothed. While this is nice for gripping the wire, it makes it difficult to sharpen them. I prefer Prosnip as it has 1 toothed jaw and 1 smooth jaw.
Left, right and straight cutting snips are available. These tools are designed for cutting sheet metal, so there are several varieties to fit the needs of the sheet workers. For most maille purposes the 'straight cutting' snips are desired. For Wiss, these are the M3(yellow handle) and M5 (red handle) tools. From Prosnip, it is #103(yellow handle).
There are also other less expensive, generic snips on the market.
How to Use Snips
I wind my springs tightly. Some people wind loose springs so that the rings are already opened, but i find that the rings don't come out a consistent size. These comments are based on tight springs so your experiences may be different.
Only cut one or two rings at a time. The more rings you cut at a time, the greater your ring distortion will be. (More on ring distortion below).
Do not allow the cutter jaws to close all the way. This causes fish hook ring distortion (discussed below). I put the jaws as far into the spring as I can and cut only one or two rings.
Snips, in my experience are one of the more difficult to use tools for maille. Since they are basically industrial scissors, they act like scissors do with paper sometimes: the spring will want to go between the blades. This causes an unsightly and unpleasantly tactile closure. There are ways of solving this, but first you must identify what is happening. When you try to cut the spring, the ring you are trying to cut will attempt to rotate at the point you are cutting it. This point of rotation is what tries to slip between the blades. This causes a 'valley' in the next several rings, making them much more difficult to cut, as they are already trying to slip between the cutter blades. There are several things you can do to avoid, and fix this when it happens:
1. Hold the end of the spring tightly between your thumb and the side of your index finger. If you hold the ring
you are cutting and the next couple rings behind it, the ring will have no place to rotate, and the snips will have nowhere to go but through the wire. After a day of this you can easily develop a blister on your thumb whether you have a callous or not. Gloves may help, but I find it difficult to cut springs with gloves on.
2. Twist your snips against the rotating ring while you cut. If the wire wants to go between the blades, then twisting the snips against the direction they want to go will facilitate your cutting as you twist at the wrist.
3. Move the snips in a slight downward motion as you twist. It is much easier to cut something by dragging a knife along it than by pressing down on it with a knife. Moving downward slightly slides the blade along the metal, facilitating your cut.
Experiment with different variations of this, and find the perfect method for you, or throw it out the window and do it your own way (my favorite choice).
Ring Distortion
The three groups of rings in this image are:
raw (top center)
closed (lower left)
closed and made flush (lower right)
When you cut a ring with snips, one end of the ring is pushed up as you can see in the lower left group of rings. This can be fixed in two ways. The one I prefer to use is to squish the ring by putting pressure on the outside, and pushing the raised end to meet with the other end. The other way is placing the closure between the jaws of your pliers and moving both ends of the ring. I find this method mars the ring really easily. Either method can be done rather quickly once you get used to it, but it adds a lot of time after 10,000 repetitions.
Another kind of ring distortion that you can get is when you allow the jaws of the snips to close all the way. Your ring comes out looking like a fish hook. These can be 'squished' back into a round ring. Some people like to use these as opened rings, but I find that they take more time than simply cutting one at a time. If you find that you are always getting fish hook distortion, it may be caused by a couple of factors:
1. You may be applying too much pressure too quickly. Learn to feel the snips cut through the wire, and listen for the 'click' when the blades hit the next ring. Let up on the snips when you hear the click.
2. The inner diameter of the spring may be too small for the end of the jaws of the snips. Try holding the snips upside down, as sometimes the upper cutting head is thinner than the lower and will allow you to get it further into the spring. Another option is grinding down the head of your snips a little bit. You can read more about this in the article Modified Aviation Snips, which was written by David Austin.
***** Important *****
Some people have luck with cutting stainless steel rings with snips. I do not advise it. I have had snips that will not work for three ring sizes because of a silly experiment. Never use your good tools on hard metals without testing them with a pair of junkers first!
Bolt Cutters
Generic bolt cutters are really easy to use. You can cut as many rings at a time as you want and you're still going to get the same lousy >< cut. There are some modifications you can do to them to improve them, but I won't go into that here.
Knipex Cobolt 2 Bolt Cutters
These are the best tool I have ever used for cutting hard stainless. They are usually rather expensive, but worth every penny. If you get these, get the spring-loaded ones! It's worth the extra five dollars.
For some magical reason the cuts that these give on hard metals is somewhere between >< and //, and that's saying something for hand-cut stainless!
Diagonal Cutters
Generic diagonal cutters are much like generic bolt cutters, but they give a slightly better cut. I have had 1/4" of a jaw break off of a pair of these while cutting 17ga galvanized wire. This is a popular tool for the 'score and break' method of cutting rings.
Klein 2000-D48
A Klein tool, like any quality tool, is a wonderful thing. I have had mine for over a year and a half and have seen very little dulling. In fact, I can still cut thread cleanly with these... they're that sharp. Klein makes two pairs of diagonal cutters that are very similar: the angled head (2000-D48), and the straight head (2000-D28). If you have a choice, get the angled head, it is a wonderful thing.
Electrician's Wire Cutters
These are much like diagonal cutters, except much, much smaller. these are usually used for micromaille applications.
Xuron Double-flush Cutters
I have never used these, but from what i understand they are the best tool for micromaille on the market.
Toenail Clippers
You may laugh, but these can be really handy for some of those insanity maille projects that you've never been wanting to do. Not good for harder metals.
End Nippers
These function much like diagonal cutters except the cutting surface is perpendicular to the handles. this is a common tool for the 'score and break' method of cutting rings.
Jeweler's Saws
These things are wonderful! I can get blades in sizes ranging from 8/0 to 10 (from my supplier). The variety of blades are useful, for me, from 28ga wire to 6ga wire. Jewelers saw blades only cut in one direction, as opposed to hack saws (see below). It helps to lubricate your saw blade. You can use beeswax, professional saw blade wax stuff, professional grade lubricant oil, or nose grease. I find nose grease to be the most cost effective. I rub my nose with my thumb and forefinger, and slide it along the blade every 10 minutes or so.
When purchasing a jeweler's saw make sure to get an adjustable frame. Your blade should sit taught, and if the frame does not adjust then your blade will be loose and more likely to break.
Hack Saws
There are two major varieties of hack saws that I have seen.
Full fledged hack saws: while these are nice for breaking out of jail, but they are unwieldy for making chainmaille.
Hobby hack saws: the blades on these are about 5"-6" long, and the one I have has a 4ga wire frame.
Hack saw blades not only cut straight down, but they also remove material on the side as they cut, making the kerf wider.
Hack saw blades are easier to use when lubricated, much like jeweler's saws. You can use any of the lubricants listed above for jeweler's saws on hack saw blades.
Dremel Tool
Seeing as I've never used one I asked Dweezle.
Thanks Dweezle!
--Lubrication.
I never used any, but I think it might help keep things from heating up too much. I'm not sure what it's called, but there's some sort of cutting oil we use in the shop for drilling through thick metal. Something like that might help for dremel cutting. But then again, metal dust, and dust from the disc might just combine with the lube and muck things up.
--Cutting Discs.
I'm not sure what they are called, but I used some 1/32' [1/32"? -- ed] thick red-brown colored abrasive cut-off discs, probably about 1" in diameter. They were expensive and it was probably about six years ago so I don't remember what they cost, but the ratio of price to life expectancy was not good. They also liked to shatter and send chunks of themselves into my face. Another disc I used was an abrasive cut-off disc that was reinforced with fiberglass. They were probably about twice as thick as the others but I remember they were lot more durable. I did not use them much because of the thickness. Diamond-coated discs are also available, but they're made for cutting glass and stone. I've heard they heat up too much for cutting metal.
--Safety.
Wear safety goggles to protect from flying disc fragments and the occasional flying ring. A dust mask is also a good idea so you don't breathe in the metal and abrasive dust. Gloves are also good. Don't hold the coil in your hands while cutting. If holding the dremel in your hands while cutting, it's best to hold it with both hands and be careful of kickback that will happen once in a while (sometimes accompanied by shattering discs).
--What's Involved?
A dremel and some cut-off discs. Something to hold the coil while cutting is good. Maybe a wooden or metal rod held horizontally in a vice and a bucket to catch rings that might slide off the end. Just start at one end of the coil and work your way to the other end.
I know a guy who had another method where he put the dremel in the vice and hand fed the coil into it, with a container to catch rings.
If I was going to use a dremel again for cutting coils I'd rig up some kind of bench-top thing with the coil held horizontally on a mandrel, and the dremel bolted down on a thing that could slide over the length of the coil. It would prevent the kickback you get from holding the dremel by hand. Another thing that comes to mind is building something similar to that coil cutter jump ring making tool that people on The Chainmaille Board have mentioned a few times. But I'd probably need access to a machine shop for that.
--Maintenance
Not sure. Let the dremel take a break once in a while. The motor in my first cheap wannabe dremel burned out because I over-worked it. If a dowel or mandrel is used to hold the coil while cutting, it'll probably need to be replaced once in a while. Constant need to buy more discs is the biggest problem.
I'll mention that a dremel can be used to score a line down the length of the coil, then the rings can be twisted off. It is the same idea as the 'score and break' method of cutting rings. I use that for brass and bronze alloys that don't like me trying to score them with cutters.
Band Saw
Thank you Simon-Pierre Aubin for providing us with this information.
--Safety considerations
The work space must be clean and appropriate. Wear gloves and security glasses. The band saw is kind of noisy so ear protection would be better (earmuffs or earplugs).
--Lubrication? yes/no?
You may lubricate the blade with a special cutting wax but candle wax is fine too.
The lubrication of the blade is not necessary but it extends the blade's life.
--What sort of setup is involved?
To cut rings with a portable band saw, you need a vise to keep the coil steady. I've replaced the metal jaws of my vise for nylon jaws, it keeps the coils better that way. Unfortunately, the nylon jaws melt with the heat generated by the cut so I have to replace the jaws from time to time (not too often). I can only cut coils from two to three inches long. I lose a bit more material, but the speed increase compensates this very much. With this method, I can cut 20,000 rings (16g, 1/4" ID but the ring size doesn't matter) in one day (I've made it).
--Is there a lot of maintenance involved with this machinery?
There's no more maintenance needed than for a electric drill or a scroll saw. You need to replace the blade from time to time (depends on the blade and the type of metal you cut).
Original URL: http://www.mailleartisans.org/articles/articledisplay.php?key=18
